Choosing between a dynamic and condenser microphone depends less on which mic is “better” than on where you record, how your voice sounds, and how much control you have over background noise. For most podcasters recording at home, a dynamic mic is usually the safer first choice because it rejects more room sound. A condenser mic can sound detailed and polished, but it works best in a quiet, treated space with careful mic technique.
Which Microphone is Better for Podcasting?
For podcasting, a dynamic microphone is often better for untreated rooms, shared spaces, and beginner setups, while a condenser microphone is often better for controlled studios, voiceover-style narration, and hosts who want extra detail. If your room has echo, traffic noise, computer fans, or hard walls, a dynamic mic can make your recording sound more focused. If your space is quiet and acoustically managed, a condenser mic can capture a more open, crisp vocal tone.
That is the practical heart of the dynamic vs condenser microphone decision. A great podcast sound comes from the full chain: the room, the mic, mic placement, recording software, editing, and the speaker’s performance. The mic matters, but it cannot fully fix a noisy room or poor recording habits.
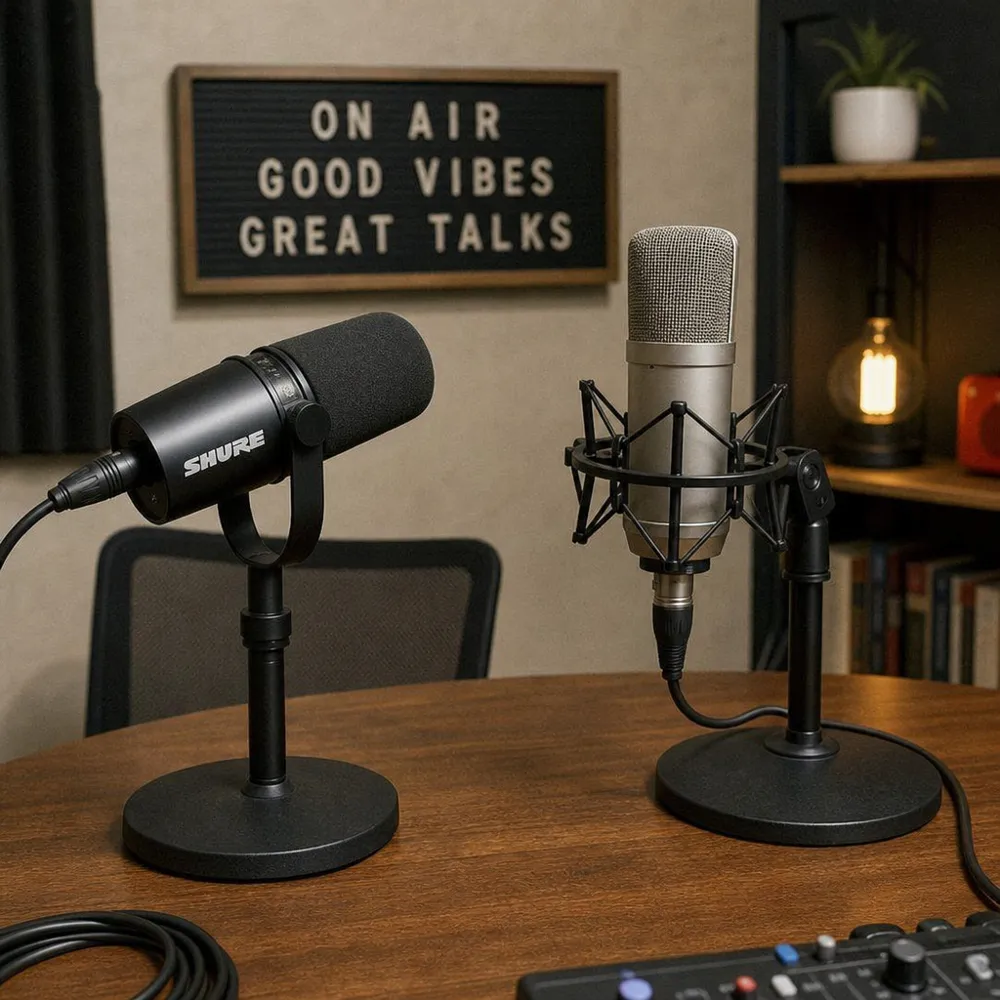
The Core Difference Between Dynamic and Condenser Microphones
The main difference in the microphone condenser vs dynamic conversation is how each mic converts sound into an electrical signal. A dynamic microphone uses a moving coil attached to a diaphragm. When sound hits the diaphragm, the coil moves within a magnetic field and creates the signal.
A condenser microphone uses a thin diaphragm placed near a charged backplate. This design is more sensitive and usually requires power, commonly from phantom power supplied by an audio interface, mixer, or recorder. Because condensers respond to subtle details, they can pick up more nuance in a voice—but also more room tone, keyboard clicks, chair squeaks, and distant sounds.
In simple terms: dynamic mics are typically less sensitive and more forgiving; condenser mics are typically more sensitive and revealing. That difference affects almost every podcasting decision.
Dynamic Microphones for Podcasting
Dynamic microphones are popular in podcasting because they are durable, focused, and relatively forgiving in imperfect spaces. Many are designed for close speaking, which helps place the voice front and center while reducing the prominence of background noise.
Where Dynamic Mics Shine
A dynamic mic is a strong fit when your recording space is not professionally treated. Bedrooms, home offices, multipurpose rooms, and apartments often create reflections that make voices sound boxy or distant. A dynamic mic used close to the mouth can reduce those problems.
Dynamic mics also suit energetic speakers. If you laugh loudly, move slightly while talking, or record long conversations, a dynamic mic can feel easier to manage. It is also a smart choice for in-person podcasting because multiple hosts in one room are less likely to bleed heavily into every mic.
Dynamic Mic Trade-offs
Dynamic microphones often need more gain than condenser microphones. Depending on the mic and interface, you may need to turn the preamp up higher or use an inline gain booster. If the gain is too low, your recording may sound quiet; if the preamp is noisy, boosting the signal may add hiss.
They can also sound less airy than condensers. That is not automatically bad. For spoken-word podcasts, a warm, controlled voice is often more useful than an ultra-detailed recording that exposes every room flaw.
Condenser Microphones for Podcasting
A condenser microphone can produce a detailed, polished sound when the environment supports it. In the condenser vs dynamic mic debate, this is where condensers stand out: clarity, sensitivity, and high-frequency detail.
Where Condenser Mics Shine
Condenser mics are excellent when you record in a quiet room with soft furnishings, acoustic treatment, or a dedicated studio setup. They can capture the texture of a voice, subtle expression, and a sense of space that works well for narrative podcasts, interviews, audiobooks, and solo commentary.
They are also common in video podcasting setups where the mic may sit slightly farther from the speaker. However, distance comes at a cost. The farther the mic is from your mouth, the more room sound it captures.
Condenser Mic Trade-offs
The same sensitivity that makes a condenser sound detailed can create problems. It may pick up HVAC systems, outside traffic, mouth noise, computer fans, and reflections from walls or windows. If your space sounds echoey in everyday conversation, a condenser will likely reveal that echo.
Most condenser mics also require phantom power or another power source. Before buying, check whether your interface, mixer, or recorder can supply what the mic needs. USB condenser microphones handle power through the computer connection, but the room-sensitivity issue still applies.
Dynamic vs Condenser Microphone Comparison
The easiest way to compare a condenser microphone vs dynamic microphone is to look at real podcasting conditions, not just spec sheets.
Best environment
- Dynamic microphone: Untreated or moderately noisy rooms
- Condenser microphone: Quiet, treated rooms
Sensitivity
- Dynamic microphone: Lower sensitivity; more focused pickup
- Condenser microphone: Higher sensitivity; captures more detail
Background noise
- Dynamic microphone: Usually rejects more room sound
- Condenser microphone: More likely to capture noise and reflections
Vocal tone
- Dynamic microphone: Often warm, direct, broadcast-style
- Condenser microphone: Often crisp, open, and detailed
Power needs
- Dynamic microphone: Usually no phantom power for passive models
- Condenser microphone: Usually needs phantom power or USB power
Technique
- Dynamic microphone: Works best close to the mouth
- Condenser microphone: Can work close or slightly farther away
Common podcast use
- Dynamic microphone: Interviews, home studios, group recordings
- Condenser microphone: Studio narration, voiceover, controlled solo recording
This comparison is not absolute. Some dynamic mics are very detailed, and some condensers are designed to be more controlled. Still, the general pattern is reliable enough to guide most buying decisions.
How Should Your Recording Space Influence Your Choice?
Your room should influence your microphone choice more than your wish list does. If you record in a reflective or noisy space, choose a mic that helps minimize the room. If you record in a quiet, controlled environment, you can choose a mic that captures more detail without exposing distractions.
A quick room test helps. Clap once and listen for ringing, flutter, or a sharp echo. Then record 30 seconds of silence and normal speech. If the room sounds present in the recording, a dynamic microphone vs condenser microphone comparison will usually favor the dynamic mic. Our guide to setting up a podcast studio at home covers simple, affordable ways to treat your room.
Room Clues That Favor a Dynamic Mic
Choose a dynamic mic if you deal with:
- Bare walls, hardwood floors, or large windows
- Computer fans, air conditioning, or street noise
- Multiple people recording in the same room
- A desk setup where the mic is close to a keyboard
- Limited ability to add acoustic panels, rugs, or curtains
Room Clues That Favor a Condenser Mic
Choose a condenser mic if you have:
- A quiet recording space with minimal interruptions
- Soft surfaces, acoustic treatment, or a vocal booth
- A solo recording workflow with controlled mic placement
- A voice that benefits from extra brightness and detail
- Time to manage gain, distance, and editing carefully
Mic Technique Matters as Much as Mic Type
Even the best mic can sound bad when used poorly. For podcasting, placement is often the difference between a full, intimate voice and a thin, roomy recording. Start with the mic 3 to 6 inches from your mouth for many dynamic mics, slightly off-axis to reduce plosives. For condensers, experiment with a bit more distance only if the room sounds good.
Use a pop filter or foam windscreen to control bursts from “p” and “b” sounds. Keep your mouth at a consistent distance from the mic, especially during long conversations. If you turn your head while speaking, your tone and volume may change noticeably.
A simple setup checklist:
- Set the mic at mouth height so you speak directly across or slightly past it.
- Record a short test before every episode and listen on headphones.
- Adjust gain so peaks stay controlled rather than pushing the signal too hot.
- Reduce noise at the source by closing windows, silencing phones, and moving fans away.
- Keep the mic close enough to make your voice stronger than the room.
USB or XLR: The Connection Choice
The condenser microphone vs dynamic mic decision is separate from USB vs XLR, but both choices affect your workflow. USB microphones connect directly to a computer and are convenient for solo creators. They are simple, portable, and usually require fewer accessories.
XLR microphones connect through an audio interface, mixer, or recorder. This setup gives you more upgrade flexibility and can be better for multi-mic recording. If you plan to record several hosts locally, XLR is often easier to manage cleanly.
You can find both dynamic and condenser microphones in USB and XLR versions. A USB dynamic mic can be a great beginner podcasting tool. An XLR condenser can be excellent in a studio. Match the connection to your workflow, not just the capsule type.
Choosing by Podcast Format
Different podcast formats place different demands on the microphone. Before you buy, think about how you actually record, not how you imagine a studio should look.
For solo shows recorded at a desk, either mic type can work. A dynamic mic is best if the room is untreated; a condenser can work beautifully if the space is quiet. For remote interviews, your guest’s mic and connection matter too, so recording software becomes just as important as your hardware.
For co-hosted in-person podcasts, dynamic mics usually make life easier because they help reduce bleed between speakers. For narrative shows, meditations, or scripted audio, condensers can add intimacy and detail when the room supports them.
Budget, Accessories, and the Real Cost of Good Sound
A microphone is only one part of the podcasting budget. You may also need headphones, a boom arm, a shock mount, a pop filter, an audio interface, cables, or acoustic treatment. Sometimes a modest dynamic mic plus basic room improvements sounds better than an expensive condenser in a harsh room.
Think of your budget in layers:
- Essential: microphone, headphones, and reliable recording software
- Helpful: boom arm, pop filter, stable stand, and quiet recording area
- Upgrade: interface, acoustic panels, backup recorder, or higher-end mic
If you are still building your setup, prioritize consistency. A repeatable recording environment and clean workflow will do more for your podcast than constantly swapping gear.
Software Completes the Recording Chain
Your microphone captures the voice, but your recording platform shapes the production workflow. This is especially important for remote podcasts, where each participant may have a different mic, room, and internet connection.
Zencastr helps podcasters record conversations, manage production, and create episodes without making the microphone the only focus. Whether you choose a condenser microphone or dynamic mic, a dependable recording workflow helps you get cleaner, more usable audio. To start building your podcast setup, try Zencastr for free at zencastr.com.
A Practical Decision Framework
If you are still weighing condenser vs dynamic microphone options, use this quick decision framework:
- Choose a dynamic mic if you record at home, have background noise, share your space, record with multiple people, or want a forgiving podcast sound.
- Choose a condenser mic if you have a quiet room, want extra vocal detail, record scripted content, or can control reflections and noise.
- Choose USB if you want simplicity and usually record alone.
- Choose XLR if you want a more expandable setup or plan to record multiple local microphones.
- Improve your room first if your test recordings sound echoey, distant, or noisy.
For most new podcasters, the best starting point is a dynamic microphone, headphones, a stable stand, and a quiet corner. Once you understand your voice, format, and editing workflow, you can decide whether a condenser offers a meaningful upgrade.
Final Recommendation
The dynamic microphone vs condenser microphone choice should begin with your recording environment. Dynamic mics are usually the practical choice for home podcasting because they keep the voice focused and reduce unwanted room sound. Condenser mics can deliver excellent clarity, but they reward careful setup and punish noisy spaces.
If you want the safest path, start with the mic that matches your room rather than the one that looks most professional. Good podcast audio is not about owning the most sensitive microphone; it is about capturing a clear, consistent voice your listeners can enjoy from the first minute to the last.